Connect to Database
Modify Settings
To make Django able to connect to your database, you have to specify it in the
DATABASES tuple in the settings.py file.
Before, it looked like this:
SQLite
my_tennis_club/my_tennis_club/settings.py:
.
.
DATABASES = {
    'default': {
        'ENGINE': 'django.db.backends.sqlite3',
        'NAME': BASE_DIR / 'db.sqlite3',
    }
}
.
Now, you should change it to look like this:
PostgreSQL
my_tennis_club/my_tennis_club/settings.py:
.
.
DATABASES = {
    'default': {
        'ENGINE': 'django.db.backends.postgresql',
        'NAME': 'postgres',
        'USER': 'masteruser',
        'PASSWORD': '12345678',
        'HOST': 'w3-django-project.cdxmgq9zqqlr.us-east-1.rds.amazonaws.com',
        'PORT': '5432'
    }
}
.
Note: The values will be different for your project.
Engine?
As you can see in the
settings.py file,
we insert
postgresql
instead of
sqlite.
Name?
The database does not have a name, but you have to assign one in order to access the database.
If no name is given, the provider accepts 'postgres'
as the name of the database.
Username and Password?
Insert the username and password that you specified when you created the database.
Host? Port?
As you can see in the
settings.py file,
we insert
postgresql
instead of
sqlite,
and insert the username and password that we specified when we created the database.
The
HOST
and
PORT
can be found under the "Connectivity & security" section in the RDS instance.
They are described as "Endpoint" and "Port":
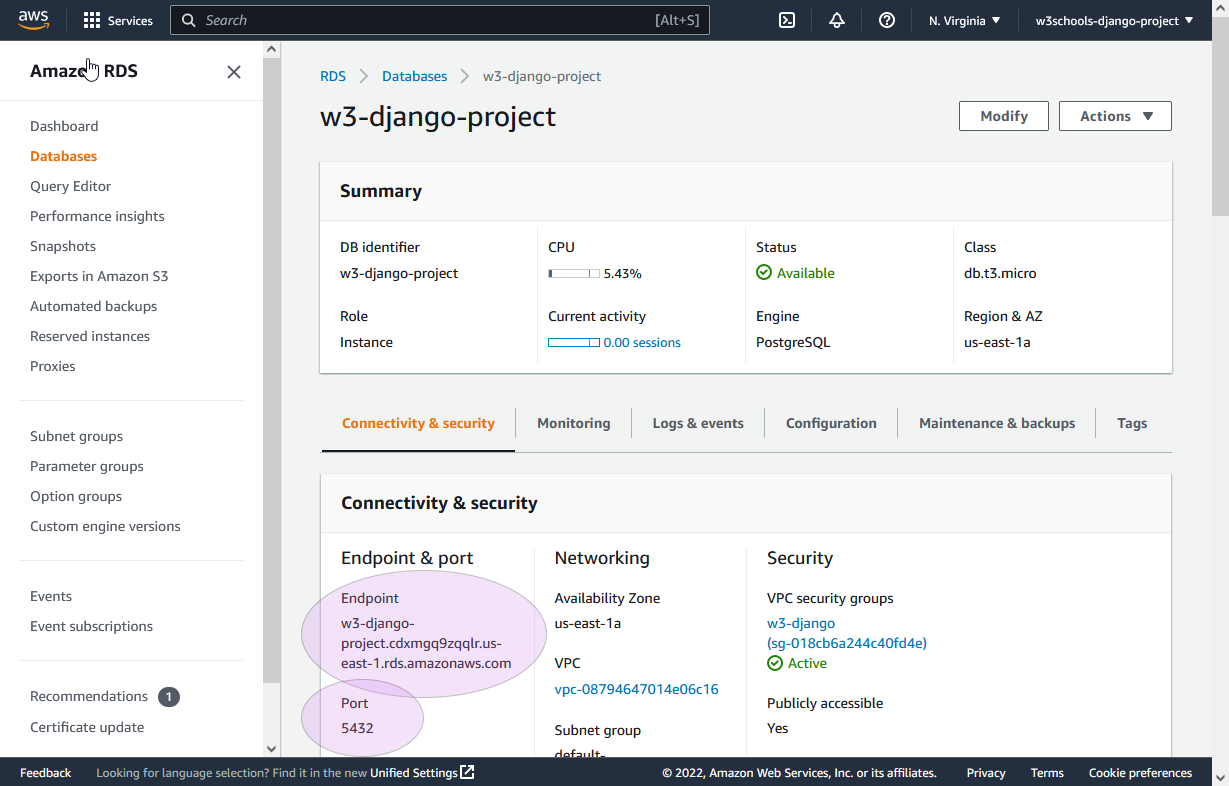
Which for my project is this:
'HOST': 'w3-django-project.cdxmgq9zqqlr.us-east-1.rds.amazonaws.com'
'PORT': '5432'
Migrate
Once we have done the changes in settings.py,
we must run a migration in our virtual environment, before the changes will take place:
python manage.py migrate
Which will give you this result:
Operations to perform:
Apply all migrations: admin, auth, contenttypes, members, sessions
Running migrations:
Applying contenttypes.0001_initial... OK
Applying auth.0001_initial... OK
Applying admin.0001_initial... OK
Applying admin.0002_logentry_remove_auto_add... OK
Applying admin.0003_logentry_add_action_flag_choices... OK
Applying contenttypes.0002_remove_content_type_name... OK
Applying auth.0002_alter_permission_name_max_length... OK
Applying auth.0003_alter_user_email_max_length... OK
Applying auth.0004_alter_user_username_opts... OK
Applying auth.0005_alter_user_last_login_null... OK
Applying auth.0006_require_contenttypes_0002... OK
Applying auth.0007_alter_validators_add_error_messages... OK
Applying auth.0008_alter_user_username_max_length... OK
Applying auth.0009_alter_user_last_name_max_length... OK
Applying auth.0010_alter_group_name_max_length... OK
Applying auth.0011_update_proxy_permissions... OK
Applying auth.0012_alter_user_first_name_max_length... OK
Applying members.0001_initial... OK
Applying members.0002_members_delete_member... OK
Applying members.0003_rename_members_member... OK
Applying sessions.0001_initial... OK
Now, if you run the project:
python manage.py runserver
And view it in your browser:
127.0.0.1:8000/.
You will get the home page of the project, but if you click on the "members" link, you will see that there are no members.
That is because the database is empty. In the next chapter we will fill the database with members.
