Tkinter Layout
Place the Widgets
Layout is how the widgets are placed in the window. Tkinter has two common ways to do it:
pack()puts the widgets after each othergrid()puts the widgets in rows and columns
pack()
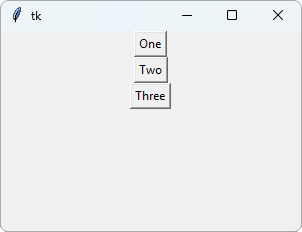
By default, pack() puts each widget under the one before it, in the middle:
Example
Three buttons on top of each other:
import tkinter as tk
window = tk.Tk()
window.geometry("300x200")
button1 = tk.Button(window, text="One")
button1.pack()
button2 = tk.Button(window, text="Two")
button2.pack()
button3 = tk.Button(window, text="Three")
button3.pack()
window.mainloop()
Result:
Side by Side
Use side="left" to put the widgets next to each other, from the left:
Example
Three buttons side by side:
import tkinter as tk
window = tk.Tk()
window.geometry("300x200")
button1 = tk.Button(window, text="One")
button1.pack(side="left")
button2 = tk.Button(window, text="Two")
button2.pack(side="left")
button3 = tk.Button(window, text="Three")
button3.pack(side="left")
window.mainloop()
Result:
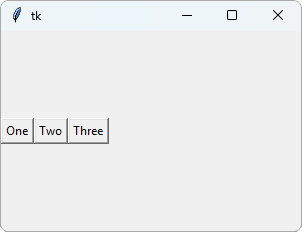
The buttons are placed halfway down the window.
That is because pack() gives each button the full height of the window, and centers the button in it.
Space Between Widgets
Use padx and pady in pack() to add space around the widgets:
Example
Add space between the buttons:
import tkinter as tk
window = tk.Tk()
window.geometry("300x200")
button1 = tk.Button(window, text="One")
button1.pack(side="left", padx=10)
button2 = tk.Button(window, text="Two")
button2.pack(side="left", padx=10)
button3 = tk.Button(window, text="Three")
button3.pack(side="left", padx=10)
window.mainloop()
Result:
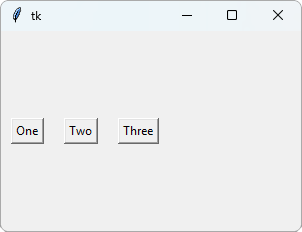
In the Tkinter Label chapter, padx and pady added space inside the label.
In pack(), they add space outside the widget.
Fill the Width
Use fill="x" to stretch a widget across the whole width of the window:
Example
A green bar across the top:
import tkinter as tk
window = tk.Tk()
window.geometry("300x200")
label = tk.Label(window, text="My App",
bg="#04AA6D",
fg="white")
label.pack(fill="x")
window.mainloop()
Result:
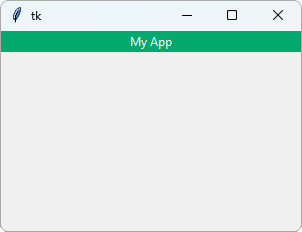
x is the horizontal direction, from left to right.
grid()
grid() places the widgets in rows and columns, like a table. Rows and columns are counted from 0:
Example
A small form with grid():
import tkinter as tk
window = tk.Tk()
window.geometry("300x200")
label1 = tk.Label(window, text="Name")
label1.grid(row=0, column=0)
entry1 = tk.Entry(window)
entry1.grid(row=0, column=1)
label2 = tk.Label(window, text="Email")
label2.grid(row=1, column=0)
entry2 = tk.Entry(window)
entry2.grid(row=1, column=1)
window.mainloop()
Result:
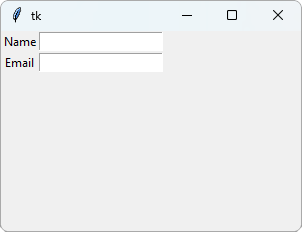
The form is in the top left corner of the window. grid() starts there, and does not center the widgets.
Note: Use either pack() or grid() for the widgets in the same window, not both. Mixing them in the same window gives an error.
Group Widgets in a Frame
A Frame is an empty box that holds other widgets.
The widgets in a frame have their own layout, so you can use grid() inside a frame, and pack() outside it:
Example
A form in a frame, with a button under it:
import tkinter as tk
window = tk.Tk()
window.geometry("300x200")
form = tk.Frame(window)
form.pack(pady=10)
label1 = tk.Label(form, text="Name")
label1.grid(row=0, column=0)
entry1 = tk.Entry(form)
entry1.grid(row=0, column=1)
label2 = tk.Label(form, text="Email")
label2.grid(row=1, column=0)
entry2 = tk.Entry(form)
entry2.grid(row=1, column=1)
button = tk.Button(window, text="Send")
button.pack()
window.mainloop()
Result:
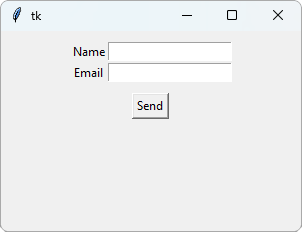
The labels and text fields are placed in form, not in window.
The frame itself is placed with pack(), so the form is centered, and the Send button goes under it.