
Power BI Get Data from Databases and Web
Get Data from a Database
Most companies keep their important data in databases, not in files.
A database runs on a server, a computer that many people and programs connect to.
One server can hold several databases, and each database holds tables.
Power BI can connect to many kinds of databases, such as SQL Server, Oracle, MySQL and PostgreSQL.
The steps are almost the same for all of them.
This page uses SQL Server, the database from Microsoft.
Unlike a CSV file, a database table already has column names and data types.
Power BI reads them from the database, so it does not have to guess.
Note: To follow these steps, you need access to a SQL Server database, for example at work.
Ask your IT department for the server name, the database name, and how you should sign in.
If you do not have access to one, just read along.
The rest of this tutorial uses files.
Connect to SQL Server
Imagine the Poke Mart keeps its orders in a SQL Server database called PokeMart, on a server called POKEMART-SQL.
Both names are made up for this example.
- On the Home tab, select Get data > SQL Server. In the Get Data window, it is called SQL Server database, in the Database category.
- The SQL Server database dialog opens. In Server, type the server name, for example POKEMART-SQL.
- In Database (optional), type the database name, for example PokeMart.
- Under Data Connectivity mode, keep Import selected.
- Select OK.
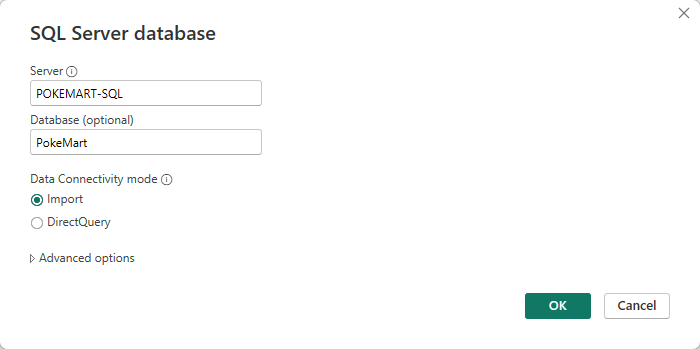
The fields in the dialog are:
| Field | What to enter |
|---|---|
| Server | The name of the server. Some servers run more than one copy of SQL Server, called instances. Then the name has the instance after a backslash, for example POKEMART-SQL\SALES. |
| Database (optional) | The database on that server. If you leave it empty, the Navigator lists all the databases you are allowed to see. |
| Data Connectivity mode | Import copies the data into your report. DirectQuery leaves it in the database. The next page, Import vs DirectQuery, explains the difference. |
| Advanced options | Extra settings, such as a SQL statement: your own query instead of picking tables. Leave them empty unless you know SQL. |
Sign In
The first time you connect to a server, Power BI asks how to sign in. The common choices are:
- Windows: use the account you are signed in to Windows with. This is common inside a company network.
- Database: a user name and password that are stored in SQL Server itself.
- An organizational account (Microsoft Entra ID), if the server supports it.
Choose the method your IT department gave you, enter the details, and select Connect.
If the connection is not encrypted, Power BI tells you so and asks whether to continue without encryption.
Only continue if your IT department says it is OK.
Power BI remembers how you signed in to each server, so it asks only once.
To change or clear the saved sign-in later, select File > Options and settings > Data source settings.
Pick the Tables
The Navigator opens and lists the tables and views in the database.
In our example, it could show tables for sales, products and stores.
Select the tables you need, then select Load or Transform Data, just like with a file.
Pick only the tables you need.
A company database can have hundreds of tables and millions of rows, and with Import, all the rows you choose are copied into your report.
Get Data from a Web Page
Web pages often show data in tables: prices, results, lists.
The Web connector reads the HTML tables on a page and turns each one into a table you can load.
The Poke Mart price list is on this page:
https://www.w3schools.com/powerbi/poke_mart_prices.html
Open it in your browser first.
It shows one table with three columns: Product, Category and Price.
To load it into Power BI:
- On the Home tab, select Get data > Web.
- The From Web dialog opens. Keep Basic selected, paste the address above into the URL box, and select OK.
- The first time you visit a site, Power BI asks how to sign in. The page is public, so select Anonymous, then Connect.
- The Navigator lists the tables it found on the page. Select Table 1. The price list appears in the preview.
- Select Load.
If you are not sure which table holds your data, select the Web View tab in the Navigator.
It shows the page itself, with each table it found highlighted.
The loaded table has all 10 products:
| ABCProduct | ABCCategory | 123Price |
|---|---|---|
| Poke Ball | Balls | 200 |
| Great Ball | Balls | 600 |
| Ultra Ball | Balls | 1200 |
| Potion | Medicine | 300 |
| Super Potion | Medicine | 700 |
| Hyper Potion | Medicine | 1200 |
| Revive | Medicine | 1500 |
| Antidote | Status Healers | 100 |
| Paralyze Heal | Status Healers | 200 |
| Awakening | Status Healers | 250 |
The prices are the same as the UnitPrice column in the sales data.
The web page has no data types, so Power BI detected them, like it does for a CSV file.
The new table is called Table 1.
Give it a better name: in the Data pane, right-click Table 1, select Rename, and type Prices.
Note: Web pages change.
If the owner of the site moves, renames or removes the table, the next refresh can fail or bring in the wrong data.
Use a web page as a source only when you trust it to stay the same.
The Web connector also reads files that are stored on a website.
If the URL points to a CSV or Excel file, Power BI opens that file instead of a page.
Other Data Sources
A few more sources you will often meet:
- Folder: combines all the files in a folder that have the same columns, for example one CSV file for each month.
- SharePoint folder: does the same for files in a SharePoint document library.
- SharePoint Online List: loads a list from a SharePoint site.
- OData Feed: loads data from web services that publish it in the OData format.
- Power BI semantic models: reuses a model that someone has already published. See Live Connection.