
Power BI Power Query Applied Steps and M
Every Click Is a Step
In this chapter you cleaned the Poke Mart data with buttons and menus.
Power Query recorded each change as a step in the Applied Steps list, in the Query Settings pane on the right.
If the pane is closed, select View > Query Settings.
Open pq_cleanup.pbix, the report you saved in Merge Queries, select Home > Transform data, and select the poke_mart_raw_2024 query.
Its Applied Steps list looks like this:
| Step | What it does | Chapter |
|---|---|---|
| Source | Reads the CSV file | Power Query |
| Promoted Headers | Uses the first row as column names | Power Query |
| Changed Type | Sets a data type for each column | Power Query |
| Removed Columns | Removes Notes | Columns |
| Renamed Columns | Renames Qty and Price | Columns |
| Added Custom | Adds Sales = Quantity * UnitPrice | Columns |
| Changed Type1 | Sets Sales to Whole Number | Data Types |
| Filtered Rows | Keeps rows with Quantity greater than 0, which removes the TEST ITEM rows | Filter Rows |
| Removed Duplicates | Removes duplicate rows | Filter Rows |
| Split Column by Delimiter | Splits Location at " - " | Split and Merge |
| Changed Type2 | Sets the two new columns to text (added automatically) | Split and Merge |
| Renamed Columns1 | Renames the new columns to Store and Region | Split and Merge |
| Replaced Value | Replaces Hoen with Hoenn | Replace Values |
| Trimmed Text | Removes spaces around Product | Replace Values |
| Capitalized Each Word | Capitalizes each word of Product | Replace Values |
Your list may differ a little, for example if you did some changes in a different order.
When a step name is used twice in a query, Power Query adds a number, like Changed Type1.
Select any step to see the data as it was at that point.
Select Changed Type: Notes is back, Location is still one column, and the Hoen typo is there again.
Select the last step to return to the current result.
Selecting a step does not delete anything.
Manage Steps
Right-click a step to open its menu:
| Command | What it does |
|---|---|
| Edit Settings | Opens the dialog of the step again, for example the Replace Values dialog. The gear icon next to a step does the same. Steps without settings have no gear icon. |
| Rename | Gives the step a new name, for example Fix Hoenn typo. |
| Delete | Removes the step. You can also select the step and then the X to the left of its name. |
| Delete Until End | Removes the step and every step after it. |
| Insert Step After | Adds a new step after this one. Select the new step and make your change. |
| Move before / Move after | Moves the step one place up or down. You can also drag a step to a new place. |
| Extract Previous, View Native Query, Diagnose | Advanced commands that you do not need in this tutorial. View Native Query is grayed out for a CSV file. |
| Properties... | Changes the name and adds a description. A small icon then shows next to the step, and the description appears when you point to it. |
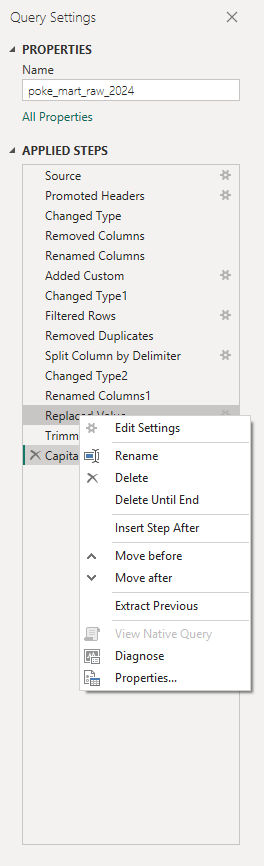
You can also add a step in the middle without the menu: select a step and make a change.
Power Query asks if you want to insert a new step at that point. Select Insert.
Note: Each step works on the result of the step before it.
If you delete or move a step, a later step may break.
For example, if you delete Renamed Columns1, there is no Region column any more, and Replaced Value shows an error when you select it, because it cannot find the Region column.
To try things out safely, duplicate the query first.
The Formula Bar
Each step is one formula in M, the formula language of Power Query.
To see the formulas, select View and tick Formula Bar. Then select a step.
For the Replaced Value step, the formula bar shows:
Example
= Table.ReplaceValue(#"Renamed Columns1","Hoen","Hoenn",Replacer.ReplaceValue,{"Region"})
Read it part by part:
Table.ReplaceValueis the M function behind Replace Values.#"Renamed Columns1"is the input: the result of the step before."Hoen","Hoenn"are the value to find and the value to replace it with.Replacer.ReplaceValuereplaces whole cells only. This is what Match entire cell contents does. Without the check box, Power Query writesReplacer.ReplaceText, which replaces the text anywhere inside a cell, and that is how Hoenn becomes Hoennn.{"Region"}is the list of columns to search.
You can edit a formula in the formula bar and press Enter.
The step changes as if you had used the dialog.
The Advanced Editor
The formula bar shows one step.
The Advanced Editor shows the whole query as M code.
Select the query, then select Home > Advanced Editor.
It is also on the View tab.
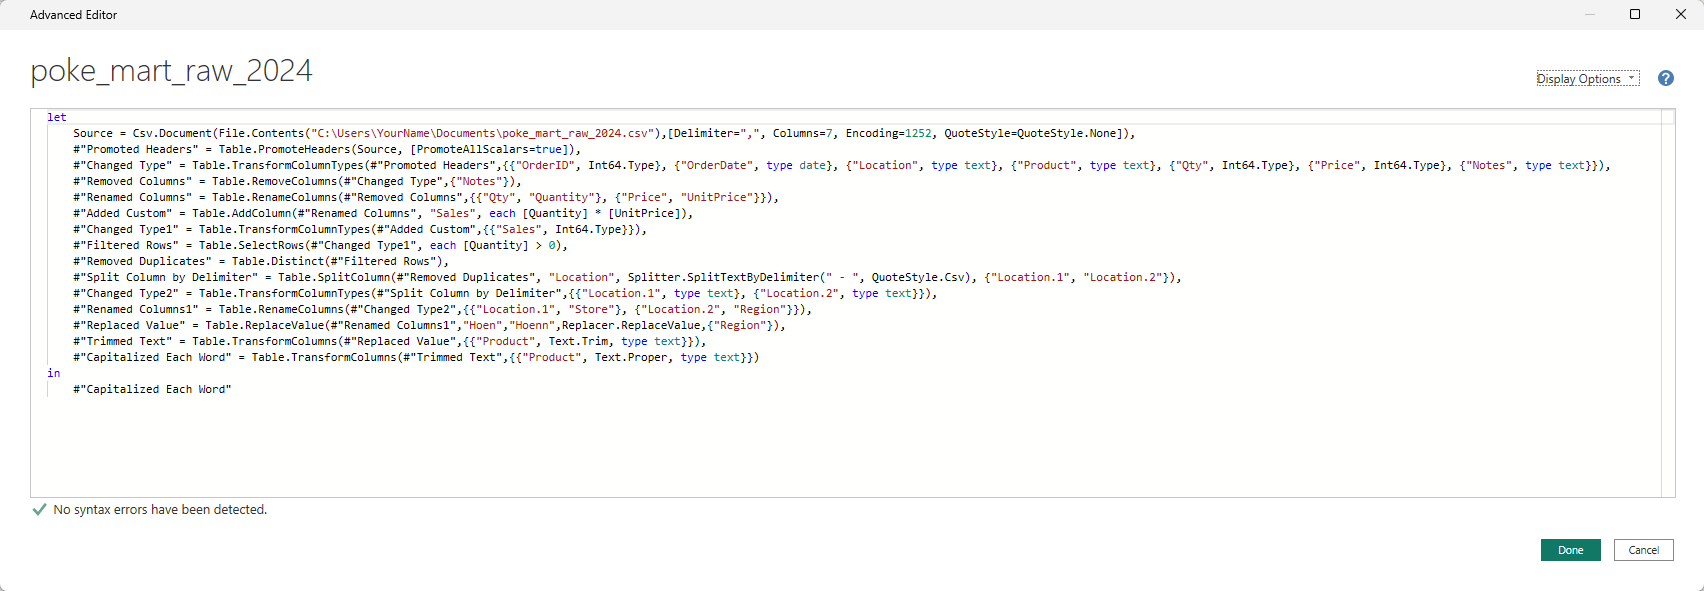
For poke_mart_raw_2024, the code is similar to this.
Your file path is different, and the step names are the ones in your Applied Steps list:
Example
let
Source = Csv.Document(File.Contents("C:\Users\YourName\Documents\poke_mart_raw_2024.csv"),[Delimiter=",", Columns=7, Encoding=1252, QuoteStyle=QuoteStyle.None]),
#"Promoted Headers" = Table.PromoteHeaders(Source, [PromoteAllScalars=true]),
#"Changed Type" = Table.TransformColumnTypes(#"Promoted Headers",{{"OrderID", Int64.Type}, {"OrderDate", type date}, {"Location", type text}, {"Product", type text}, {"Qty", Int64.Type}, {"Price", Int64.Type}, {"Notes", type text}}),
#"Removed Columns" = Table.RemoveColumns(#"Changed Type",{"Notes"}),
#"Renamed Columns" = Table.RenameColumns(#"Removed Columns",{{"Qty", "Quantity"}, {"Price", "UnitPrice"}}),
#"Added Custom" = Table.AddColumn(#"Renamed Columns", "Sales", each [Quantity] * [UnitPrice]),
#"Changed Type1" = Table.TransformColumnTypes(#"Added Custom",{{"Sales", Int64.Type}}),
#"Filtered Rows" = Table.SelectRows(#"Changed Type1", each [Quantity] > 0),
#"Removed Duplicates" = Table.Distinct(#"Filtered Rows"),
#"Split Column by Delimiter" = Table.SplitColumn(#"Removed Duplicates", "Location", Splitter.SplitTextByDelimiter(" - ", QuoteStyle.Csv), {"Location.1", "Location.2"}),
#"Changed Type2" = Table.TransformColumnTypes(#"Split Column by Delimiter",{{"Location.1", type text}, {"Location.2", type text}}),
#"Renamed Columns1" = Table.RenameColumns(#"Changed Type2",{{"Location.1", "Store"}, {"Location.2", "Region"}}),
#"Replaced Value" = Table.ReplaceValue(#"Renamed Columns1","Hoen","Hoenn",Replacer.ReplaceValue,{"Region"}),
#"Trimmed Text" = Table.TransformColumns(#"Replaced Value",{{"Product", Text.Trim, type text}}),
#"Capitalized Each Word" = Table.TransformColumns(#"Trimmed Text",{{"Product", Text.Proper, type text}})
in
#"Capitalized Each Word"
How to Read M
- The code starts with
letand ends within. - Between them, each line is one step: a name, an equal sign, and a formula. A comma ends every step except the last one.
- A step name with spaces is written with a hash sign and quotes, like
#"Removed Columns". - Each step uses the step before it as its input.
#"Removed Columns"starts from#"Changed Type". - After
incomes the step whose result the query returns, usually the last one. - Function names follow the pattern Group.Name:
Table.RemoveColumnsworks on a table,Text.Trimworks on text. - M is case sensitive.
Table.RemoveColumnsworks, buttable.removecolumnsdoes not.
Select Done to close the Advanced Editor, or Cancel to close it without saving changes.
If you change the code, the editor tells you whether it found any syntax errors.
The Sales Query
A query can use other queries by their names.
This is the M code of the Sales query, similar to what you see in its Advanced Editor:
Example
let
Source = Table.Combine({poke_mart_raw_2024, poke_mart_raw_2025}),
#"Merged Queries" = Table.NestedJoin(Source, {"Product"}, poke_mart_products, {"Product"}, "poke_mart_products", JoinKind.LeftOuter),
#"Expanded poke_mart_products" = Table.ExpandTableColumn(#"Merged Queries", "poke_mart_products", {"Category", "UnitCost"}, {"Category", "UnitCost"}),
#"Added Custom" = Table.AddColumn(#"Expanded poke_mart_products", "Cost", each [Quantity] * [UnitCost]),
#"Changed Type" = Table.TransformColumnTypes(#"Added Custom",{{"Cost", Int64.Type}})
in
#"Changed Type"
Table.Combine is the append, Table.NestedJoin is the merge, and Table.ExpandTableColumn is the expand.
JoinKind.LeftOuter is the join kind you chose in the Merge dialog.
M or DAX?
Power BI has two formula languages:
- M works in Power Query. It gets data and shapes it, before the data is loaded.
- DAX works in the report. It calculates results from the loaded data, such as a total that changes when you click a slicer.
You rarely need to write M by hand.
The Power Query buttons write it for you, and being able to read it is usually enough.
DAX is covered in the DAX chapter.
What You Learned
- Every change in the Power Query Editor is saved as a step in Applied Steps.
- You can select, rename, delete, move and insert steps, and change a step's settings with the gear icon.
- Each step is one M formula, which you can see in the formula bar.
- The Advanced Editor shows the whole query as M code, between
letandin. - Because the steps are saved, Power Query repeats the whole cleanup every time the data is refreshed.
This is the end of the Power Query chapter.
Next, you learn how to build a data model with several related tables, starting with the star schema.