
Power BI Get Data from Excel and CSV
Get Data from an Excel Workbook
Excel files are the most common data source in Power BI.
You already loaded one in the First Report chapter:
- On the Home tab, select Get data > Excel workbook.
- Find the file and select Open.
- In the Navigator, select the check box next to each item you want.
- Select Load, or Transform Data to clean the data first.
Power BI reads the values in the workbook.
Formatting is ignored, and for a cell with a formula, Power BI reads the result, not the formula.
Always save the workbook before you load it.
Power BI reads the saved file, not what is on your screen in Excel.
Note: Power BI reads .xlsx files directly.
Older .xls files need an extra driver from Microsoft, the Access Database Engine.
If you get an error with an old file, open it in Excel and save it as .xlsx.
Sheets, Tables and Named Ranges
A workbook can hold data in three kinds of containers.
The Navigator lists all of them by name:
| Item | What Power BI loads | Example name |
|---|---|---|
| Worksheet | The whole used area of the sheet, including titles, notes and empty rows. Empty cells become null. | Sales (the sheet tab) |
| Excel table | Only the rows and columns of the table. The header row gives the column names. | tblSales (the table name) |
| Named range | Only the cells in the range. | PriceList (the range name) |
A named range is a range you gave a name, for example by typing it in the Name Box.
If a sheet holds data but no Excel table, the Navigator may also show a group called Suggested Tables.
These are blocks of data that Power BI found on the sheets by itself.
Which One Should You Load?
Pick an Excel table when the workbook has one:
- Power BI gets exactly the data, with no titles or notes around it.
- When you add rows in Excel, the table grows, and Power BI gets the new rows at the next refresh.
A worksheet works well when the sheet holds one block of data with the column names in row 1, like the Sales sheet in poke_mart_sales.xlsx.
Power BI turns the first row into column names.
Note: Power BI finds a sheet, table or named range by its name.
If you rename it in Excel later, the next refresh fails.
Try It: Load an Excel Table
The practice file has only a sheet.
Turn its data into an Excel table and see how the Navigator changes:
- Open poke_mart_sales.xlsx (download it here) in Excel and save a copy named poke_mart_table.xlsx. Work in the copy, so the original stays as it is.
- Click any cell in the data and press Ctrl+T. Keep My table has headers selected and select OK.
- On the Table Design tab, type tblSales in the Table Name box and press Enter.
- Save and close the workbook.
- In Power BI Desktop, select Get data > Excel workbook, and open poke_mart_table.xlsx.
The Navigator now lists two items: tblSales, the table, and Sales, the sheet.
The two items have different icons.
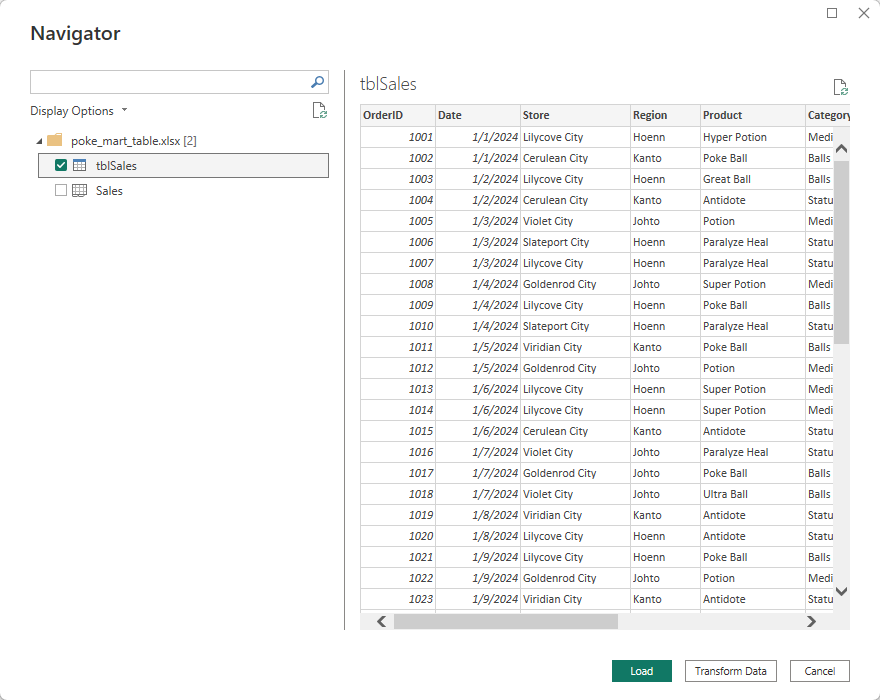
Both hold the same 2,740 rows here, because the table covers the whole sheet.
Select tblSales and then Load.
The new table in the Data pane is called tblSales.
Get Data from a CSV File
A CSV file (comma-separated values) is a plain text file.
Each line is one row, and commas separate the columns.
The first line usually holds the column names.
These are the first lines of poke_mart_sales.csv, the same Poke Mart data as the Excel file:
OrderID,Date,Store,Region,Product,Category,Quantity,UnitPrice,Sales,Cost
1001,2024-01-01,Lilycove City,Hoenn,Hyper Potion,Medicine,1,1200,1200,680
1002,2024-01-01,Cerulean City,Kanto,Poke Ball,Balls,19,200,3800,2090
1003,2024-01-02,Lilycove City,Hoenn,Great Ball,Balls,13,600,7800,4290
A CSV file has no sheets, no formatting and no data types.
Everything in it is text, so Power BI has to guess what kind of data each column holds.
To load it:
- Open Power BI Desktop and start a blank report.
- On the Home tab, select Get data > Text/CSV.
- Find poke_mart_sales.csv and select Open.
- A preview window opens, with the file name at the top. Check the three settings above the preview.
- Select Load.
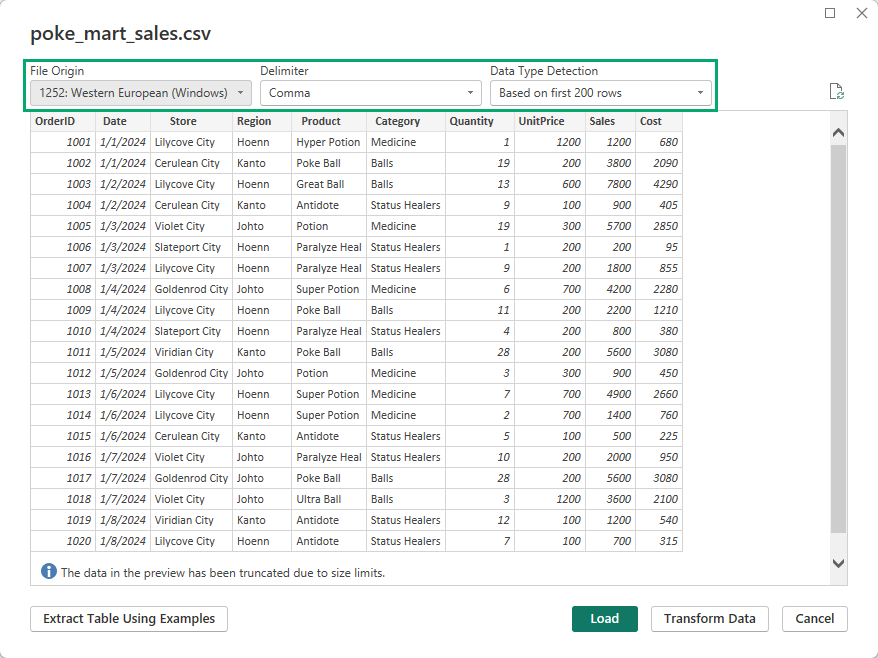
The Three Settings
| Setting | What it does | For poke_mart_sales.csv |
|---|---|---|
| File Origin | The character set (encoding) the file was saved with. It matters for letters such as é or ü. | Keep the default, 1252: Western European (Windows). The file has only plain letters and numbers. |
| Delimiter | The character between the columns: comma, semicolon, tab, space and others, or a custom one. Power BI detects it. | Comma |
| Data Type Detection | How Power BI guesses the type of each column: from the first 200 rows, from the entire file, or not at all (every column stays text). | Based on first 200 rows, the default |
A few tips for other CSV files:
- If all the data ends up in one column, the delimiter is wrong. Many European CSV files use semicolons, because the comma is the decimal separator there. Set Delimiter to Semicolon.
- If letters with accents look wrong, for example "Café" shows as "Café", change File Origin to UTF-8. Power BI only detects UTF-8 when the file starts with a special marker, a byte order mark.
- Detecting types from the entire file is more careful, but it can be slow for big files.
The Result
Power BI creates a table named poke_mart_sales, after the file name.
It has the same 2,740 rows and 10 columns as the Sales sheet in the Excel file.
These are the data types Power BI detected:
| 123OrderID | DATEDate | ABCStore | ABCRegion | ABCProduct | ABCCategory | 123Quantity | 123UnitPrice | 123Sales | 123Cost |
|---|---|---|---|---|---|---|---|---|---|
| 1001 | 2024-01-01 | Lilycove City | Hoenn | Hyper Potion | Medicine | 1 | 1200 | 1200 | 680 |
| 1002 | 2024-01-01 | Cerulean City | Kanto | Poke Ball | Balls | 19 | 200 | 3800 | 2090 |
| 1003 | 2024-01-02 | Lilycove City | Hoenn | Great Ball | Balls | 13 | 600 | 7800 | 4290 |
| 1004 | 2024-01-02 | Cerulean City | Kanto | Antidote | Status Healers | 9 | 100 | 900 | 405 |
| 1005 | 2024-01-03 | Violet City | Johto | Potion | Medicine | 19 | 300 | 5700 | 2850 |
| 1006 | 2024-01-03 | Slateport City | Hoenn | Paralyze Heal | Status Healers | 1 | 200 | 200 | 95 |
| ... | ... | ... | ... | ... | ... | ... | ... | ... | ... |
The badges show the type of each column: 123 whole number, DATE date, and ABC text.
Behind the scenes, Power Query added three steps to the query: Source (read the file), Promoted Headers (use the first line as column names) and Changed Type (set the detected types).
You will see these steps in the Power Query chapter.
Excel or CSV?
| Excel workbook | CSV file | |
|---|---|---|
| Tables per file | Many: sheets, Excel tables and named ranges | One |
| Data types | Numbers and dates are stored as numbers and dates | Everything is text, and Power BI guesses the types |
| Formatting and formulas | Ignored: Power BI reads the values | None |
| Typical origin | Often made and edited by people | Often exported by another program, such as a shop system |
Moving the File Breaks Refresh
Power BI does not copy the file into the report.
It stores the full path to the file, for example:
C:\Users\YourName\Documents\poke_mart_sales.csv
Each time you refresh the data, Power BI opens the file at that path again.
If you move, rename or delete the file, the refresh fails with an error that says Power BI cannot find the file.
To point the report to the new location:
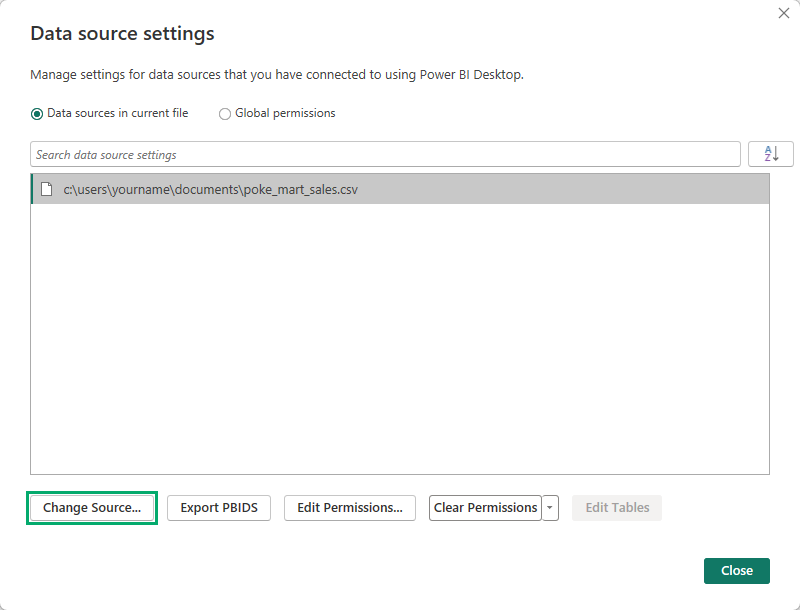
- On the Home tab, select the arrow under Transform data, then Data source settings. (You can also use File > Options and settings > Data source settings.)
- Make sure Data sources in current file is selected.
- Select the old path of the file in the list. Power BI shows the path in lowercase, for example c:\users\yourname\documents\poke_mart_sales.csv.
- Select Change Source....
- A dialog named after the file type opens, here Comma-Separated Values. Select Browse..., find the file in its new place, and select OK.
- Select Close. A pale orange bar with a warning icon appears below the ribbon: "There are pending changes in your queries that haven't been applied." Select Apply changes.
You can also change the path in the Power Query Editor, in the settings of the query's Source step.
The same thing happens when you send a .pbix file to a colleague: the path does not exist on their computer.
Keep data files that several people use in a shared place that everyone can reach, such as a SharePoint site or a network folder.
Keep your practice files in one fixed folder, for example your Documents folder, and do not move them while you work through this tutorial.